VMware vROps - vROps Policies Demystified

When you edit vROps Policies, you are presented with a screen that has a ton of settings and expected to know exactly what to customize to meet your unique organization's needs. Not to worry, I'll cover the bare minimum of the settings you should change when you first deploy vROps or when you finally want to get a handle on your environment. You can always go back and adjust more settings later, or create entirely new policies to meet your specific SLAs.

The navigation panel allows you to move between various setting groups like Analysis, Metrics, Alerts/Symptoms, etc. In this post, we will focus on the Analysis part of vROps Policies since this category seems to be the most challenging for many uses. Help is self-explanatory. I always close Help to make more room for real work.
The Analysis Settings section is further subdivided into resource groups such as Cluster Compute Resource (aka vSphere Cluster), Datacenter, Datastore, Host System (vSphere ESXi), etc. Notice anything missing here by default?

Each of these resource sections comes with its own set of settings that can be customized. Also, when you look at settings among different resource groups, these seem to be repetitive, as each resource category can be analyzed by vROps individually. The good news is that most of these settings have default values that will probably cover most standard use cases, with few exceptions that I will get into next. Before making any changes, get comfortable navigating the various setting options and using the controls, as it can be a little quirky if you are new to vROps. Remember, if you mess something up just click Cancel in the lower left corner to exit the Policy screen and no harm will be done.
So, without further ado, let's look at what needs to be tweaked and why.

Often, this leads to misleading capacity recommendations, confusion, and unnecessary sanity checks. It can be altogether avoided by changing the CPU and Memory Stress settings to help vROps do better analysis and provide more accurate recommendations. I typically set CPU and Memory Stress to at least 8 hours or 480 minutes. This way, vROps will do a better job normalizing all of the peaks and provide better recommendations. Changing this setting is especially important when you have batch processing, backups, or anti-virus scans running in your environment after business hours. Since these activities can be CPU intensive during their scheduled job window, they can increase VM Stress and vROps could be making inappropriate recommendations, such as to add more resources when they are not truly needed. So, if you don't intend to do anything else in the policies, at least change the Stress settings right now. You will thank me later!

Take for example a VM that runs a virus scan job in the middle of the night and pegs the CPU at 100% for say 50 minutes. Since the CPU Demand will go over the 70% (default) watermark for most of the collection intervals during the Any 1 hour (default) period, vROps will increase the Stress value for this VM a lot. However, if the 1-hour window is extended to a longer period, say 8 hours, then vROps will consider that peek utilization over a longer time frame and would not make as drastic of an increase in the Stress value. In effect the peeks get smoothed over when the time sample considered is extended.

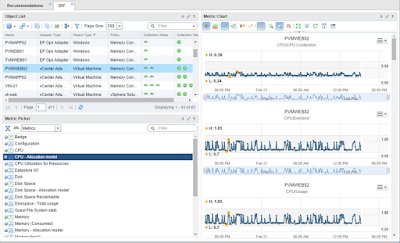
If we look at some extreme examples of this we will see some very aggressive CPU recommendations for certain VMs.

However, when we try to justify these recommendations by looking at the overall CPU Demand we see a lot of idle and then some heavy spikes for a short amount of time. This a tale-tale sign that our Stress settings are not optimal and we could benefit from better recommendations.


An Edit Monitoring Policy screens will be presented, and you will be taken to Analysis Settings section, and more specifically the vCenter Adapter - Cluster Compute Resource configuration settings area. Collapse the vCenter Adapter - Cluster Compute Resource subsection and from the Navigation on the left, under Show changes for click the drop-down, scroll down, and select vCenter Adapter - Virtual Machine.

Then click Show object type icon to add the vCenter Adapter - Virtual Machine subsection to the configuration pane.

Expand the vCenter Adapter - Virtual Machine subsection and unlock the Stress settings.

Scroll down to reveal all of the Stress settings, you can change 60 Minute Peak values for CPU and Memory to 480. You can also change this to another value that suits your needs better, but I find that 8 hours is the bare minimum due to the nature of how stress is calculated in vROps.

Alternatively, you can change the Sliding Analysis Window to Entire Range, which will account for the entire time metrics are collected rather than a specific time slice.

Another option for excluding the specific demand periods form the calculations involves changing when usage is tracked under the Time Range settings. This, however, will have an impact on data collection and therefore is not a preferred method.

This post went deeper than I was hoping for... anyways. Special thanks to fellow VMware PSO consultant Howard Rusko for inspiring this blog post and Max Drury for providing feedback.
Get a handle on vROps Policies
But, first things first, let's go over how to navigate the Policies wizard, which overwhelms some people and causes them to close it as soon as they open it. The wizard is divided into 3 main panels: Navigation, Configuration Settings, and Help.
The navigation panel allows you to move between various setting groups like Analysis, Metrics, Alerts/Symptoms, etc. In this post, we will focus on the Analysis part of vROps Policies since this category seems to be the most challenging for many uses. Help is self-explanatory. I always close Help to make more room for real work.
The Analysis Settings section is further subdivided into resource groups such as Cluster Compute Resource (aka vSphere Cluster), Datacenter, Datastore, Host System (vSphere ESXi), etc. Notice anything missing here by default?

Each of these resource sections comes with its own set of settings that can be customized. Also, when you look at settings among different resource groups, these seem to be repetitive, as each resource category can be analyzed by vROps individually. The good news is that most of these settings have default values that will probably cover most standard use cases, with few exceptions that I will get into next. Before making any changes, get comfortable navigating the various setting options and using the controls, as it can be a little quirky if you are new to vROps. Remember, if you mess something up just click Cancel in the lower left corner to exit the Policy screen and no harm will be done.
So, without further ado, let's look at what needs to be tweaked and why.
Virtual Machine Stress Settings: theory. Change this if nothing else!
This is probably one of the most important settings that I recommend tweaking, yet it is the most often overlooked one! OOTB vROps has a very aggressive stress level setting (60 minutes) for VMs.
Often, this leads to misleading capacity recommendations, confusion, and unnecessary sanity checks. It can be altogether avoided by changing the CPU and Memory Stress settings to help vROps do better analysis and provide more accurate recommendations. I typically set CPU and Memory Stress to at least 8 hours or 480 minutes. This way, vROps will do a better job normalizing all of the peaks and provide better recommendations. Changing this setting is especially important when you have batch processing, backups, or anti-virus scans running in your environment after business hours. Since these activities can be CPU intensive during their scheduled job window, they can increase VM Stress and vROps could be making inappropriate recommendations, such as to add more resources when they are not truly needed. So, if you don't intend to do anything else in the policies, at least change the Stress settings right now. You will thank me later!
Why should I care about Stress in vROps?
By now you may be asking: what is Stress in vROps and why should I care? Let me give a little primer on it. In vROps Stress determines how Demand is reported for resources and usable capacity over time. So in essence Stress affects Capacity Remaining calculations and Recommendations for VM CPU and Memory Rightsizing. This last part here is kind of important. For example: when you look at the Virtual Machine Reclaimable Capacity, the reclaimable and recommended resources are impacted by VM Stress value. So if the stress settings are not configured correctly in policy, the recommendations will not be accurate.
Take for example a VM that runs a virus scan job in the middle of the night and pegs the CPU at 100% for say 50 minutes. Since the CPU Demand will go over the 70% (default) watermark for most of the collection intervals during the Any 1 hour (default) period, vROps will increase the Stress value for this VM a lot. However, if the 1-hour window is extended to a longer period, say 8 hours, then vROps will consider that peek utilization over a longer time frame and would not make as drastic of an increase in the Stress value. In effect the peeks get smoothed over when the time sample considered is extended.

If we look at some extreme examples of this we will see some very aggressive CPU recommendations for certain VMs.

However, when we try to justify these recommendations by looking at the overall CPU Demand we see a lot of idle and then some heavy spikes for a short amount of time. This a tale-tale sign that our Stress settings are not optimal and we could benefit from better recommendations.

Virtual Machine Stress Settings: practice. Step-by-step.
Prior to changing any settings, you must first add the missing Virtual Machine section to the Analysis Settings section, since for some reason it's not there by default. Login to vROps with an account that has permissions to edit policies, normally the default admin account. Go to Administration, then Policies, click Policy Library and select one of the policies you would like to edit. In this example, we'll just work with the default policy created when the first vCenter was added to vROps. This policy will be called something like vSphere Solution's Default Policy (creation date and time). Select it and click Edit Selected Policy.
An Edit Monitoring Policy screens will be presented, and you will be taken to Analysis Settings section, and more specifically the vCenter Adapter - Cluster Compute Resource configuration settings area. Collapse the vCenter Adapter - Cluster Compute Resource subsection and from the Navigation on the left, under Show changes for click the drop-down, scroll down, and select vCenter Adapter - Virtual Machine.

Then click Show object type icon to add the vCenter Adapter - Virtual Machine subsection to the configuration pane.

Expand the vCenter Adapter - Virtual Machine subsection and unlock the Stress settings.

Scroll down to reveal all of the Stress settings, you can change 60 Minute Peak values for CPU and Memory to 480. You can also change this to another value that suits your needs better, but I find that 8 hours is the bare minimum due to the nature of how stress is calculated in vROps.

Alternatively, you can change the Sliding Analysis Window to Entire Range, which will account for the entire time metrics are collected rather than a specific time slice.

Another option for excluding the specific demand periods form the calculations involves changing when usage is tracked under the Time Range settings. This, however, will have an impact on data collection and therefore is not a preferred method.

This post went deeper than I was hoping for... anyways. Special thanks to fellow VMware PSO consultant Howard Rusko for inspiring this blog post and Max Drury for providing feedback.

Comments
Post a Comment